Wednesday 25 December 2013

Stability Improvments

It's been a while since my last update and lots of progress has been made.  Today I solved a particularly frustrating problem and thought I would share the solution in case it helps somebody else.

Constant WiFi Shield Issues

I enthusiastically started building the control system for the Aquaponics using an Arduino Uno with an official Arduino Wi-Fi shield.  Almost immediately I encountered constant hangs after a period of about 6 hours where if the WiFi shield was being used, even if it was just a trivial example sketch then the Arduino would just hang suddenly.  After lots of reading I discovered a feature called a Watchdog Timer that I was sure was going to solve my problem.  After messing about for a while I got the hang of the watchdog timer and it was working quite nicely.  Time for another go with the WiFi shield.  Nope, still hanging after about 6 hours regardless of what code I was running.  The watchdog timer was unable to reset the board.  I tried upgrading the firmware on the WiFi shield but alas, no improvement.  More Googling revealed this thread which pretty much confirmed my suspicions that the WiFi shield is not ready for serious use where reliability is an issue.

Resort to Wired Ethernet

Ok, I thought after spending a day trying to see if I could fix the issue as the source code for the WiFi shield firmware was available I realized I was well over my head.  I decided that simply working around the problem was the best approach.  I got a wired Ethernet shield and plugged it into an access point acts as a bridge to the WiFi in the flat.

Memory Constraints

This setup worked nicely for a while but as I implemented more and more features and restructured the code to represent a maintainable, expandable code base I started to begin to run very, very close to the available memory limit of 2048 bytes.  The result was that, the closer I began to run to this limit, the less stable and more frequent the resets became.  I suspect this is due to the code trying to allocate a buffer for an incoming message or something and there isn't a large enough amount of continuous free space.  Everything grinds to a halt and we end up resetting, every 30 minutes or so.  The watchdog time was doing it's job nicely.  It's just a shame it had to do it so frequently.

A quick search of MindKits.co.nz revealed a larger Arduino Mega 2560 with 8k of RAM, 4x more than the Uno.  After upgrading to this larger model I noticed that with a decent amount of memory now being free I no longer got the frequent hanging that I was seeing with the Uno.  Things were looking good then after a few hours, disaster, the board hung again requiring manual intervention.  The bug that caused this was trivial to find, an accidental infinite loop when the web server returns a strange response.  What was concerning however was that the watchdog timer failed to reset the Mega.

Mega 2560 Bootloader and the Watchdog Timer

I uploaded a trivial sketch to confirm that the watchdog was working and sure enough when the timer expired, the Arduino would hang rather than reset.

More Googling led to the discovery that the bootloader that ships with the Mega 2560 doesn't support the use of a watchdog timer but can easily be upgraded with an ISP programmer.  In fact the Arduino IDE v1.0.5 comes with a version of the bootloader that supports the watchdog timer.

Great, I thought, I have a USBtinyISP that should do the job nicely.  Wrong again, the USBtinyISP only supports ROMs up to 128K and the Mega 2560 is 256k.  After further Googling, I discovered that I could use the Arduino Uno itself as an ISP programmer and I could use that to in turn flash the watchdog compatible bootloader to the Mega 2560.

However, no amounts of searching could I find a clear guide of how to wire up the Uno to the Mega to make it go so after consulting the pinouts for both shields I was able to match up the following:

To Flash a Mega 2560 Bootloader from an Arduino Uno

  1. Open the Arduino IDE v1.0.5.
  2. Tools -> Board -> Arduino Uno
  3. Set the Serial Port
  4. Open the ArduinoISP example sketch (File -> Examples -> ArduinoISP)
  5. Plug the Uno in with the USB cable
  6. Compile and upload
  7. Unplug the Uno
  8. Wire it up to the Mega 2560 with the wiring table below
    Mega Uno
    GND GND
    5V 5V
    Reset 10
    51 11
    50 12
    52 13
  9. Select Tools -> Board -> Arduino Mega 2560 or Mega ADK
  10. Select Tools -> Programmer -> Arduino as ISP
  11. Plug the USB cable back into the Uno
  12. Select Tools -> Burn Bootloader
The process will take about 2 minutes and in my case resulted in the following error message.

avrdude: verification error, first mismatch at byte 0x1e000
         0xff != 0x0d
avrdude: verification error; content mismatch

This didn't matter and my watchdog now works perfectly.

More Coming

I'll be posting more updates shortly explaining progress in other areas of the project.  It is getting closer and closer to the point where it's ready for fish.


Wednesday 3 April 2013

Grow Beds, Gravel and Siphons

It's been a while since I've updated this.  I've been too busy attending weddings, teaching Brazilian Jiu Jitsu and getting ready for another trip to Brazil.  While the bloging has been slack, I have managed to make time however for some meaningful progress on the system itself.

One of the trickiest parts of this operation so far has been the construction of the grow beds.  After much research I ended up making them out of plywood and lining them with Fireston Pond Gard EPDM rubber.

Frame made of plywood
Lined with EPDM rubber 
Very happy with how it all fits together
The next part was to build the siphons that will take the water from the grow beds back to the fish tank.  This involved various prototypes and failures before I got them working correctly.
It took several attempts to get the bulkhead to seal
Media screen to keep the gravel out
Bell siphon
Complete with gravel.  Second pipe is to gauge the water level.
I ordered a 12v pump and converted an old ATX computer power supply that I had around the house to power it and the other electronics.  To keep this all out of harms way I built a little shelf under one of the beds.  Soon I will tidy up this mess of wires and put the micro-controller in there as well to run everything.


System complete and cycling
Now that the system is complete I have left the pump to cycle water from the fish tank (no fish yet) up to the grow beds and the back to the fish tank via the siphons.  This will further rinse the gravel and give me a chance test the reliability of the setup.  The next step will be to build a swirl filter to remove any uneaten fish food and other waste on it's way from the tank to the grow beds.

Monday 21 January 2013

The Next Step

Aquaponics

After getting to the point where I can eat out of the garden on a daily basis I've decided to move on and have a go at an aquaponics setup.  Aquaponics is where you use both fish and plants in a symbiotic relationship to produce more of each other.  I feed the fish, the fish excrete ammonia into the water and then I run this water through ebb and flow grow-beds.  Bacteria grow in the gravel in the grow-beds to to assist with nitrification which is the conversion of ammonia to nitrite then in turn to nitrate.  The plants then consume the nitrate and the now less-toxic water is returned to the fish.

The end result is after a lot of setup effort you have edible fish and edible plants that grow like crazy. I will be monitoring this system using Arduino micro-controllers and an Android app that I'm going to write.

It's a pretty simple system

First I need a raised greenhouse to grown the plants in that is higher than the fish tank. This is so I only have to pump water up to the grow beds and gravity can return it to the tank.
Frame getting constructed
Big mission to get everything home!
Building the base
I've been bolting it all together rather than nailing it so that when I eventually move out of this flat I can unbolt it for transport.
Trying to work out how we get the greenhouse on now
Finished base with tomato plants
Tomatoes
In the mean-time I have just put some very wind battered tomatoes in there for some shelter.  In the next few days I will build the grow beds.  I have also ordered a 1000 litre IBC tank - this will be the fish tank for the prototype.
Fish tank... 1000 Litres
I will be posting updates as I make more progress.

Wednesday 16 January 2013

Food Everywhere!

A year ago I started the long process of organising my backyard.  This was initially only due to the fact that the lease agreement stated that I had to maintain the grounds.  In the meantime I'd got much more interested in nutrition than I previously had been and as a result my food bill has gone up dramatically.  This led me to wonder just how much food I could grow around my flat and how much money it could save me.

After a bit of trial and error and a few failures we now eat something out of the garden every day.

 Spinach
 Kale
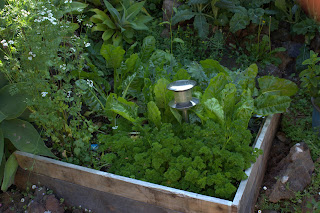
 More Spinach, Parsley, Coriander etc
 Tomatos etc


There are plenty more ways I can grow more food and I intend on using all of them.  Now my goal has changed from just trying to grow some food to actually seeing how much might be able to be produced from my flat.  Watch this space.